Jira Cloud Connector
To set up Diveni to connect to JIRA Cloud instances, refer to this guide to generate an RSA public/private key pair: https://developer.atlassian.com/cloud/jira/platform/jira-rest-api-oauth-authentication/#step-2--configure-the-client-application-as-an-oauth-consumer
After that you need to define a
consumer key. Theconsumer keycan be anything as long as it matches the application link. Theprivate key(generated in step 1) and theconsumer keyhave to be entered asJIRA_CLOUD_PRIVATEKEYandJIRA_CLOUD_CONSUMERKEYinbackend/.env
Create new Session with connection to Jira Cloud
To use JIRA Cloud with Diveni you can choose to either use our official server Diveni.io or use a self-hosted instance of Diveni. Either way, the connection process is the same for both, but for your local instance you will need to provide different credentials.
INFO
You must be an administrator of your JIRA Cloud instance to create an application link for Diveni.
Set-Up Guide for Application Links
1. Step
Go to your JIRA Cloud instance and click on the Settings icon in the top right corner. Then select Products. 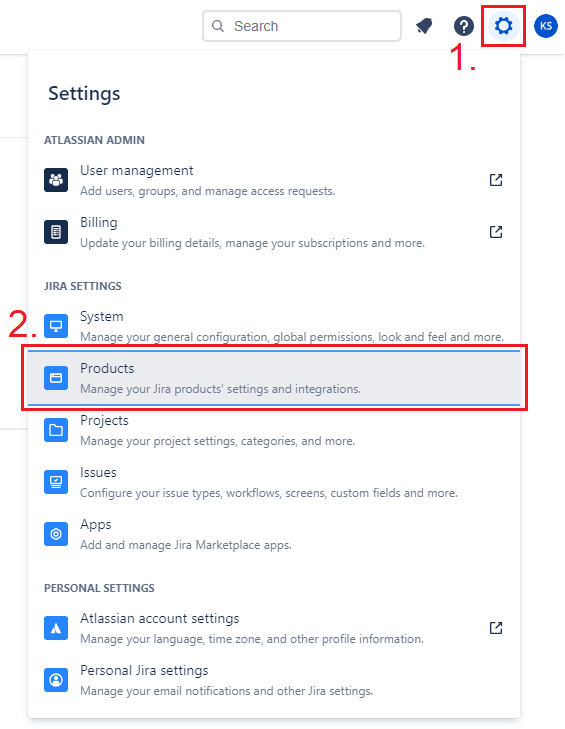
2. Step
On the configuration page click on Application links under INTEGRATIONS on the left side. 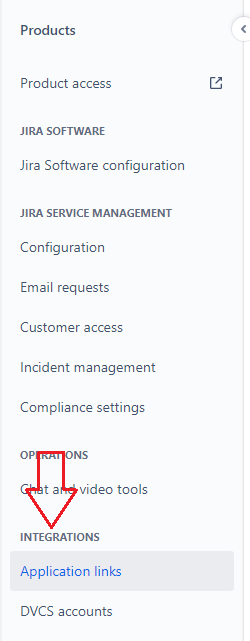
3. Step
Under Application Links, click the Create link button to create an application link. 
4. Step
A modal should appear to create a link. Make sure to select Direct application link and enter either https://diveni.io or the URL of your self-hosted instance if you do not want to use our official server. After that click on continue. 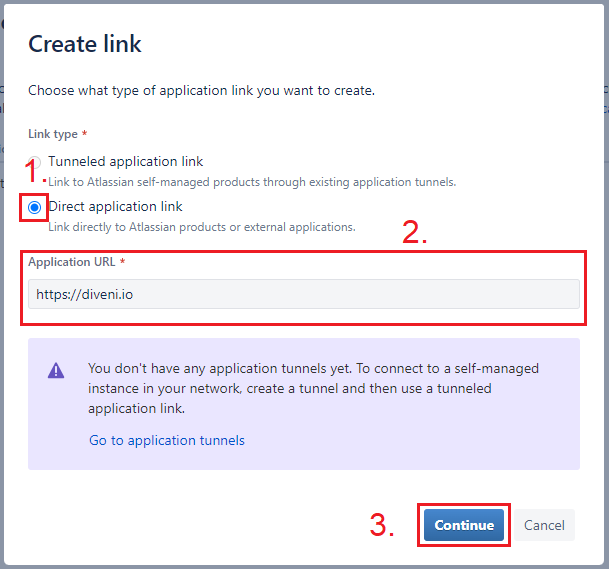
If you get a warning that there was no response from the URL you entered, ignore it. Just click continue again. 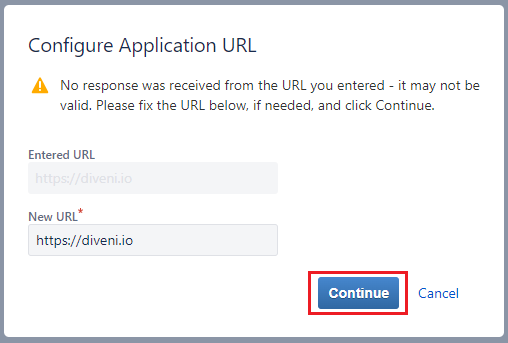
5. Step
Now a review link modal will pop up. All you have to do is enter Diveni as Application name and select Generic Application in the Application Type dropdown. Finally, make sure you check the Create incoming link checkbox and click on continue. 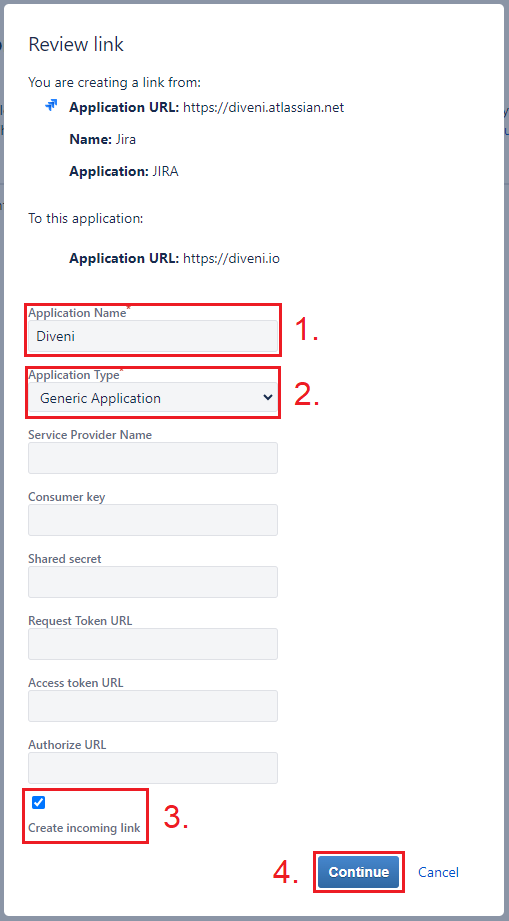
6. Step
The last on your JIRA Cloud instance is to create an incoming link.
- Set
Diveni_OauthKeyas Consumer Key (or your own consumer key for self-hosted instances) - Set
Divenias Consumer Name - Enter the following key (or your own public key for self-hosted instances) as Public Key
- Click on continue and wait for the application link to be set up
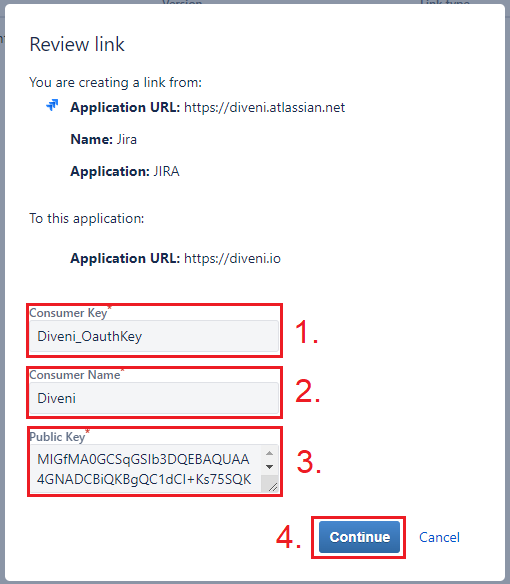
Public Key
MIGfMA0GCSqGSIb3DQEBAQUAA4GNADCBiQKBgQC1dCI+Ks75SQKHIpxeefj+K8HE hihwn9L/8NAc+A8LDCUSOClL3CDO0H8oVQOvvQwJm8RQDO3TFL+dZfaC4oW6zTkj ch2oV9sBGaZuK4gVhhzZSErzWEpZ9BnGvk3/ZuTF8niRUc35y/wo6o6lFiICRfc5 iBE48mAsbEu7kiiKvQIDAQAB
Guide for using JIRA Cloud on Diveni
7. Step
When using Diveni, you click on Planning with Issue-Tracker. Then click on the Sign in with Jira Cloud button and a input field will appear. Enter the URL of your Atlassian instance. At the end click Connect. 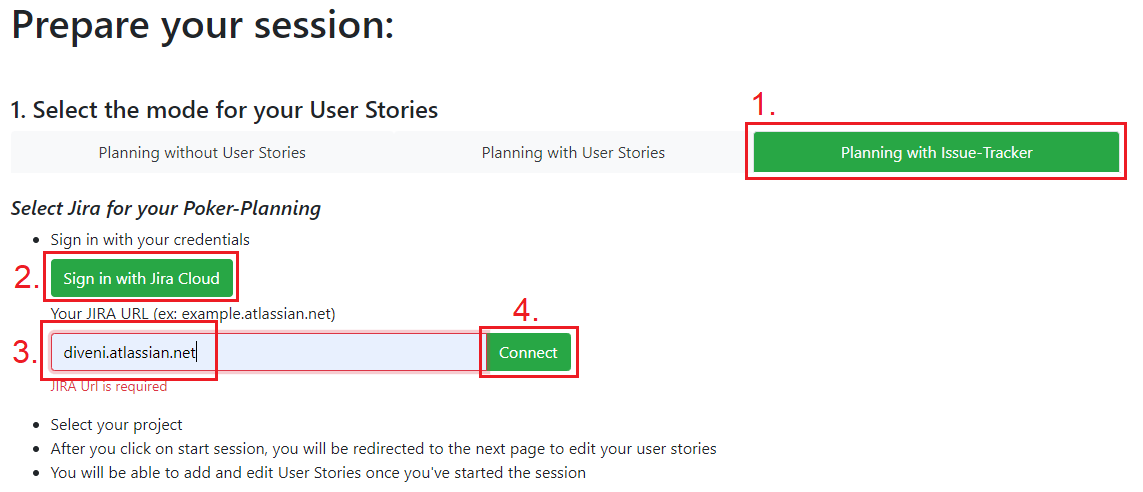
8. Step
A new browser tab will open asking you to allow access to your Atlassian instance. Simply click on Allow. 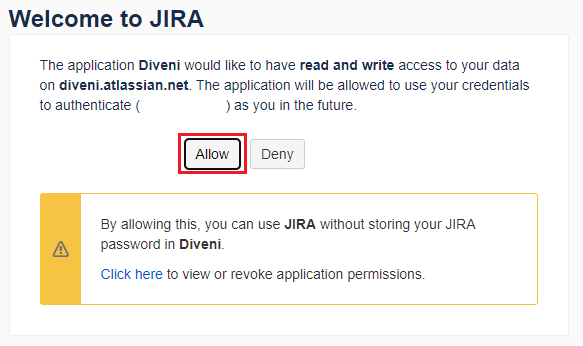
9. Step
You will be redirected to a page that says Access Approved. From there you have to copy the verification code (marked red in the screenshot). Then you can close this browser tab and return to Diveni. 
10. Step
Back at Diveni a modal will appear. There you have to enter the copied verification code into the input field and click OK. 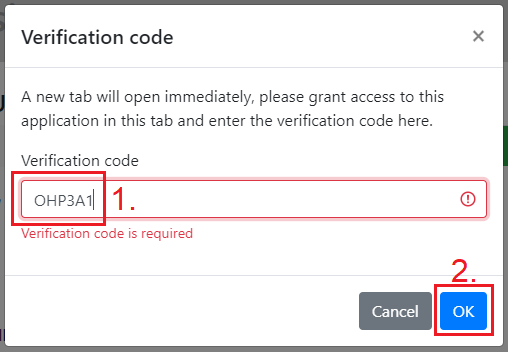
Configuration
Available configuration
| Parameter | Description | Default value |
|---|---|---|
| SERVER_URL | URL the server is running on, used for CORS-settings | null |
| LOCALE | The locale the frontend should be set to, available locales=en,de,es,fr,it,pl,pt,uk | en |
| JIRA_CLOUD_CONSUMERKEY | Consumer key | OauthKey |
| JIRA_CLOUD_PRIVATEKEY | Private key | null |
Important:
- In order to use Jira Cloud all parameters with prefix
JIRA_CLOUD_are required to be set.
Add configuration to the Diveni instance
Diveni with configuration via docker compose
To configure your local environment, you have to add your configuration to /backend/.env
See below for example:
#URL the server is running on
SERVER_URL=http://localhost:8080

#The locale the frontend should be set to
LOCALE=en

#Consumer key
JIRA_CLOUD_CONSUMERKEY=OauthKey

#Private key
JIRA_CLOUD_PRIVATEKEY=[key]
Copy the configured file to /backend/.env
Update Docker Compose to use .env
[...]
backend:
  image: ghcr.io/sybit-education/diveni-backend:latest
  container_name: diveni_backend
  depends_on:
    - database
  restart: unless-stopped
  environment:
    - "SPRING_PROFILES_ACTIVE=prod" # required
    - "SERVER_URL=http://localhost:8080"
    - "LOCALE=en"
    - "JIRA_CLOUD_CONSUMERKEY=OauthKey"
    - "JIRA_CLOUD_PRIVATEKEY=[xxx]"
  [...]
Starting App
If all the configuration is done, Diveni could be started:
docker-compose up -d